Understanding the Role of Music in TV and Film
Mixing music for television and movies requires a unique set of skills that combines technical proficiency with artistic sensibility. The process is intricate, involving various steps to ensure the music complements the visual content and enhances the overall viewing experience. This guide explores the essential aspects of mixing music for these mediums.
The Mixing Process
1. Session Set Up
-Organize your DAW (Digital Audio Workstation) session.
-Label tracks clearly and group similar elements (e.g., strings, percussion).
-Ensure all tracks are properly gain-staged.
2. Balancing Levels
-Start with a rough balance of all the tracks.
-Ensure the dialogue remains clear and intelligible by adjusting the music levels accordingly.
-Use volume automation to duck the music during dialogue-heavy scenes.
3. EQ (Equalization):
-Apply EQ to carve out space for each element.
-Use high-pass filters to remove unnecessary low frequencies from music tracks.
-Avoid frequency clashes between music and dialogue by identifying and cutting problematic frequencies.
4. Compression:
-Use compression to control dynamics and ensure a consistent level.
-Apply sidechain compression on the music bus, triggered by the dialogue track, to subtly lower the music volume when dialogue is present.
5. Reverb and Effects:
-Add reverb to blend music with the on-screen environment.
-Use reverb and delay sparingly to avoid cluttering the mix.
-Consider the acoustic space depicted in the scene when applying effects.
6. Panning and Spatialization:
-Utilize panning to create a sense of space and depth.
-Place instruments in the stereo field to match the visual elements.
-For surround sound mixes, ensure music elements are properly placed within the surround field.
Fine-Tuning and Finalizing the Mix
1. Automation:
-Automate volume, panning, and effects parameters for dynamic changes.
-Use automation to enhance transitions and emphasize key moments.
2. Reference Listening:
-Compare your mix with reference tracks from similar films or TV shows.
-Ensure the mix translates well on different playback systems (e.g., TV speakers, cinema sound systems, headphones).
3. Feedback and Revisions:
-Present the mix to the director and composer for feedback.
-Be prepared to make revisions based on their notes to align with their vision.
Delivering the Final Mix
1. Stems and Splits:
-Deliver stems (grouped elements like dialogue, music, and effects) for flexibility in the final mix.
-Provide splits of individual instruments if requested.
2. Technical Specifications:
-Ensure the final mix meets the technical specifications required by the broadcaster or studio.
-Check levels, loudness, and format requirements (e.g., stereo, 5.1 surround).
3. Quality Control:
Perform a thorough quality control check to catch any issues.
Listen for any distortions, clicks, or artifacts that may have been introduced during mixing.
Loudness Guidelines
Your True Peak should be set at -0.1. This means you must set the output or ceiling of your Limiter to -0.1. Your limiter must also be set to ‘True Peak’:

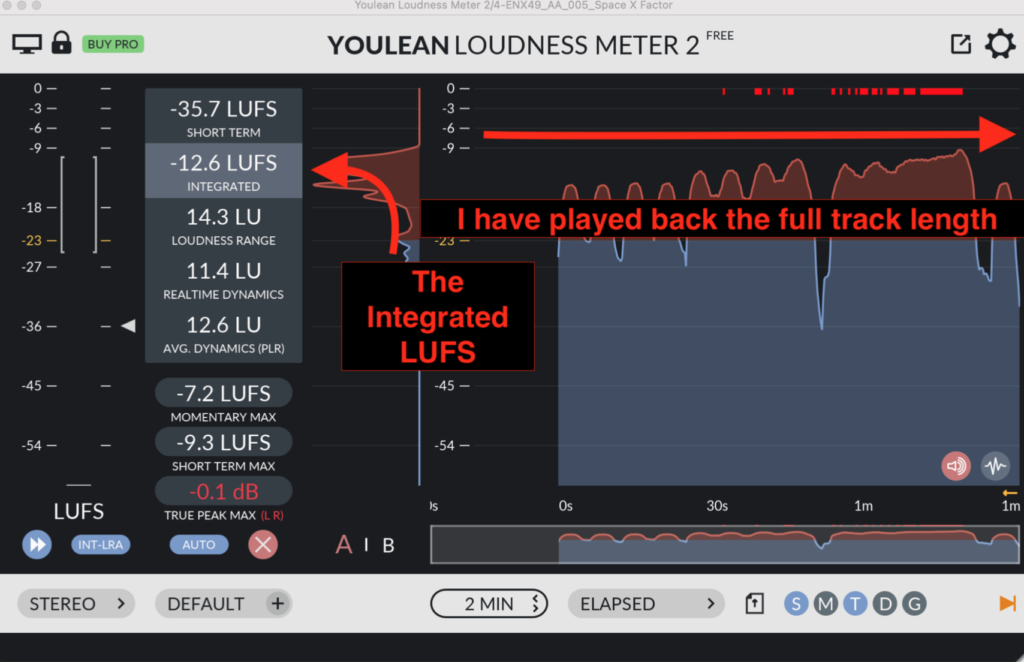
After playing back the full length of your track, your Integrated LUFS should read within plus or minus 1 db of -12 LUFS. For example:
To achieve this, the loudest sections of your music should usually have a Short Term LUFS of about -10 (within 1 db):
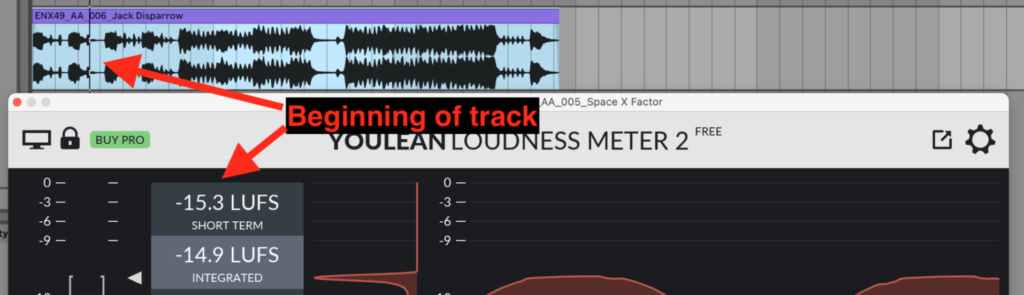
And your quietest sections of your cue should usually have a Short Term LUFS of about -15:

EQ Balance
Another aspect that becomes exposed when monitoring at low volumes is the balance between the instruments.
While much of this is genre dependent, there are some general guidelines across the board:
- Don’t have too much going on in your low end. Let the low parts of the Drums and Bass shine on their own in the lows.
- Within the Loudness guidelines, make sure no instruments stick out as being strangely loud at any moments in your music. This will require you to listen to the full piece a few times with this in mind. Try to maintain a solid level between everything
- Similarly to the above, make sure no instruments are overly quiet in any sections. If you can’t hear it, why is it there?
EQ
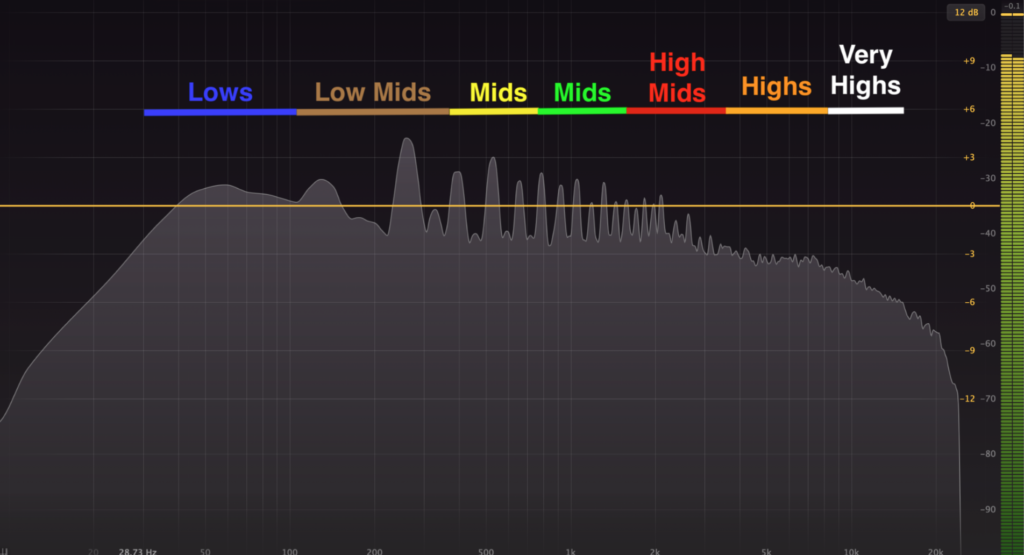
The final, and sometimes most subtle aspect that becomes exposed at low volumes is the overall brightness vs. darkness of your mix, and areas where frequencies are overwhelmed by a buildup of instruments.
Oftentimes, modern virtual instruments are developed to sound big on their own, and therefore can have a lot of information in them. When you write music using a lot of these instruments, frequencies can build up. Here is what to look out for:
- Your mix has a solid balance from lows to highs. Compared to other songs you hear on tv and that nothing appears overly dark or bright.
- That no frequencies build up or pop-out overall. Common problematic places to watch out for are the very lows, the low mids, and the high mids, though no area is excluded from having nasty frequencies or buildup. This chart identifies these areas and others of the frequency spectrum.