

Video Production Audio Essentials
Background
One of the most often ignored, yet crucial components of professional event production is sound. Audio plays such a vivid role in the way we experience everything and should be regarded as essential to productions of any kind. Long viewed as an ancillary throw-in, sound shapes the overall quality of a production in a noticeable way. One of the most common mistakes productions make relates to the level of the recorded sound. Call it gain, volume, or signal level, each refers to the transmission power level of audio signal and are most commonly referenced in decibels (dB). Before digital audio mixing was the standard, decibels were expressed in dBVU (volume unit) versus today’s digital counterpart dBFS (full scale). Think of the old-school dBVU as recording to tape compared to recording into today’s advanced digital audio workstations (DAW).

When most sound was being recorded to tape, the 0 in the dBVU meter was as high as most would push the sound level, with few exceptions. But it turns out that 0 dBVU is equal to about -14 to -18 dBFS!

There was all this additional headroom that wasn’t being used. Once this was realized, engineers began mixing audio louder because in addition to the extra headroom afforded, louder sounds will be perceived as “better” by human ears.
This led to what is known as The Loudness War where today’s music is mixed much louder than previous generations. The result is a much lower, or compressed, dynamic range, which refers to the difference between the loudest and quietest parts of recorded audio. This same principle compelled television commercials to mix their audio as loud as possible. Do you ever remember falling asleep with the television on and waking up? You probably woke up during a commercial since most non-commercial television programs mix between -3 and -10 dBFS. In 2010, Congress listened to the complaints of consumers and passed the Commercial Advertisement Loudness Mitigation Act (CALM) and empowered the FCC to set and monitor the loudness of commercials, thereby setting a standard for how loud commercials could be.
Practical Use
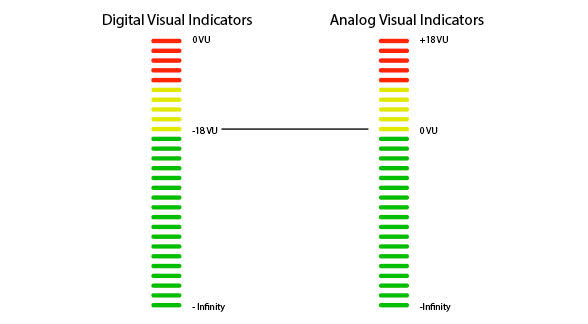
Because we are all now used to loud audio, your production audio should follow a similar pattern, but not to the loudness of popular music and certainly not to the levels of pre-2010 television commercials. When you are recording audio, you want to get enough of the signal to make sure it comes through clear, but not so much that it sounds distorted or begins to clip. You will hear a slight clicking sound when audio clips, which is when the audio signal goes above the 0 dBFS mark. If your recording device has a visual meter to show the loudness or signal level, you want the recording audio to be consistently in the upper green area and occasionally peaking, or maxing out at its’ loudest point in the yellow area. If the meter clips or goes into the red at any point during the recording, it’s too loud. You NEVER want to have the audio be in the red. In actual full scale numbers, shoot for -10 to -15 dBFS and between 0 and -3 for dBVU.

You want to get as much clean signal, like speech or sounds of a game, as possible, compared to the ambient noise in the environment you are filming and recording.
Regardless of where you are recording, there is going to be some noise. This is referred to as background or room tone and it’s present in any recording, even in the best recording studios in the world. Your signal to noise ratio should be high, getting as much signal as possible, while reducing the noise as much as you can. If you are interviewing someone in a crowded place, make sure the microphone is pointed directly at the subject’s mouth to capture as much clean signal possible. Know where the microphone is on your recording device and keep in mind how your actions will affect the recording and production. If you are using a phone to record a speech, be cognizant of how your hand movements and breathing/coughing/sneezing will add noise. Some of this is practically unavoidable and you can do a lot post production to clean things up. But the higher your signal to noise ratio when you are recording, the better the end result will be with less clean up needed afterwards.
Other Tips
If you are able to use a dedicated audio recording device apart from your camera, you should. Not only will you be able to have two distinct sources of the same audio, but you will also have more control upon the overall sound you are recording. And if you are recording audio for video, make sure the format is set to 24 bits, 48kHz sample rate. A standard music cd is 16 bit, 44.1kHz and the standard for video audio is 24/48. If your video plans to have a lot of dialogue or interviewing, consider investing in a lavalier or boom microphone to help capture spoken words more effectively. When using a separate recording device from the camera’s, remember that you will need to sync the audio and video together after you have recorded. The whole purpose of the typical black and white slate that is put in front of the camera before a take is to help sync the sound with the picture.

In place of a slate, you can always clap your hands to signal where the video recording syncs up to the audio recording.

Another important factor to consider when recording audio using a dedicated device is to know your microphone’s polar pattern. The three main patterns are omnidirectional, bi-directional, and cardioid. Omnidirectional patterns are equally sensitive to sound in all directions and will record with no directional information. The symbol on the microphone for selecting this pattern in a circle. Bi-directional patterns record sound in a sort of Figure 8, with the mic picking up sound from the front and back, but not the sides. To set your microphone to be bi-directional, find the symbol two circles on top of each other. And finally, cardioid patterns are most sensitive to sound directly in front of them and least sensitive directly behind. They get their name from their symbol’s resemblance to a heart. Pick your polar patterns based on need. If your production needs to capture sound coming from many directions simultaneously, you might consider omni. Have two people speaking back and forth across from each other? Bi-directional would probably do the trick. Recording a narration or an interview? Cardioid should give you the best chance at a clean signal to noise ratio and solid recording.
To get the best results recording audio, first assess your production’s situation and goals. Then, review your options and tailor the best course of action based on what’s available at your disposal. Making sure you get a good audio recording level, not too high and not too low, should be your first priority. After that, everything else is gravy.